Saturday, April 21, 2012

Daisy Coasters - Free Pattern

CLICK HERE TO DOWNLOAD
Summer will be here soon, and what better for your cold drinks than a set of cheery daisy coasters.  :)

Coasters are made using worsted weight 100% cotton yarn and finished size is about 5" across.
Click on the "download now" link below the top picture to get the pattern pdf.

Sunday, April 15, 2012

Eli's Birthday Projects

Eli turned 1 last month, but I've been so busy working on a new pattern that I haven't had time to post about the birthday projects my mom and I made.  Eli loves monkeys, so that was the theme of the party. Unfortunately, I forgot to bring my camera to the birthday party, so I wasn't able to get any pictures of Eli with his birthday goodies. 

My mom made him this sweet little 1st birthday bib.  She used McCall's Crafts pattern M6368, and embroidered the monkey from a design she found at www.emblibrary.com . 


I made a birthday banner, but it is so long that I wasn't able to get a good photo of it, and you can't really see it in the first photo.  It has a monkey at each end to "hold" the banner, and it says "Happy Birthday Eli".  I took a close up picture of one of the monkeys and of the Eli section of the banner to give an idea of what it looks like.
To make it,  I found a cute image of a monkey online and drew it out and made it from cardstock.  I used markers to color in the face features.  I also added a little balloon for one monkey to hold that says "Eli is 1"(I straightened out a paper clip to use for the ballon's string). 

For the banner's words, I use an alphabet clipart set I found on etsy.  The set is so cute, and included both blue letters with white polka dots and green letters with white polka dots. This was the first time I've used clipart, and it worked well, and was a lot of fun.  And it was only $1.45 for the whole set!  I printed each letter out on white cardstock and matted on brown rectangle shapes, then punched holes in the top of each rectangle to thread the ribbon through.    


And of course, Eli needed  birthday hat!  I found a really cute party hat template on the blog Oh Happy Day. I printed out the template and cut out of cardstock, and decorated.  I printed out the "1" using the same clipart that I used for the banner.  I punched tiny holes on each side and tied elastic cord for the strap. 


And as part of his birthday gift, I made Eli a little monkey using Rebecca Danger's Jerry the Musical Monkey knitting pattern.  This pattern was so much fun to make!  And Eli loves him! The only change I made was to use black felt for the eyes instead of plastic eyes. 


I don't have any birthday pictures to share, but here is Eli enjoying spring break a few weeks ago in Florida.  He loves being outside and he had a hard time last week understanding that he is now back in Indiana and it's not always warm enough to play outside every day.  :)

Eli the Beach Bum!

Monday, April 2, 2012

Mini Chocolate Bunny


Mini Bunny 7 1/2" tall, Big Bunny is 15" tall

After making a few of the Chocolate Easter Bunnies, I thought it would be fun do a little experiment and see if I could make a smaller version.   I had some brown fingering weight sock yarn on hand, and using that and a size B/1 crochet hook, I followed the original chocolate bunny pattern exactly.  The mini bunny came out to be about 7 1/2" tall.  The original is about 15" tall, so this one came out at 1/2 the size.  I didn't measure out how much fingering weight yarn it took, but I have plently left over in my ball to make several more.  So little Eli (I can't call him Baby Eli anymore, because he is 1 now and does not like to be called a baby) may have a whole herd of these in his Easter Basket this year.  :)

Friday, March 23, 2012

Easter Bunny Ring Decoration - Free Pattern

When I did my Christmas ring ornament series last year, I had a few requests to keep the ring ornaments coming for other holidays too.  So I thought I'd try a bunny ring decoration for Easter.  The bunnies are crocheted around a 2" plastic ring.  You can make them girl bunnies, boy bunnies or just plain bunnies.  A bunch of these strung together on ribbon would make a cute little bunting.  :)


Materials:
Red Heart Worsted Weight Acrylic Yarn
  - 10 yards
Size G (4.25mm) Crochet Hook
2" Plastic Ring
Yarn Needle

Round 1

Join yarn with a sl st around 2" plastic ring, ch 1, 14 sc around ring


ch 10


sc in 4th ch from hook


sc in each of the remaining 6 ch sts


continuing to work around ring, work 4 sc


ch 10


sc in 4th ch in hook and sc in each of the remaining 6 ch sts


continuing to work around the ring, 14 sc around ring, join with a sl st to 1st sc on round.


Round 2


ch 1, sc in same st as joining and sc in next 12 sts, sk next sc st


working up the outside edge of the right ear, sc in first 4 sts, hdc in next 3 sts


work 4 hdc in the space at the tip of the right ear


working down the inside edge of the right ear, hdc in next 3 sts, sc in last 4 sts


sk the first sc st after the right ear, and sc in next 2 sts, sk next sc st


working up the inside edge of left ear, sc in first 4 sts, hdc in next 3 sts, 4 hdc in space at tip of ear, then working down the outside edge of left ear, hdc in next 3 sts, sc in last 4 sts

sk the sc st following the left ear, and sc in each remaining st around, join with a sl st to beg sc.


End off, weave in ends.  Decorate as desired.  :)

Sunday, March 18, 2012

Easter Egg Coaster - Free Pattern

Hello all!  I thought it would be fun to make a cheery set of Easter Egg Coasters.  Since the design has some striped rows, it also seemed like a good opportunity to include a little tutorial on how to change colors at the end of a row.  Instead of cutting yarn and re-joining for every color change, changing colors at the end of a row, and using the same strand of each color as you work up the piece means less ends to weave in at the end. And I'm always in favor of less ends to weave in!  :)


Materials needed for one coaster:
Sugar 'n Cream Worsted Weight Cotton Yarn (or any worsted weight cotton yarn)
  - 13 yards MC
  -   6 yards White
Size G (4.25mm) Crochet Hook
Yarn Needle

Finished Size: 4 1/4" across x 5 3/4" tall

Pattern Notes:
Sc  2 sts tog – to single crochet two stitches together (decrease), insert hook into 1st stitch, yarn over and draw up loop, then insert hook into next (2nd) st, yarn over and draw up loop.  You will now have 3 loops on the hook.  Yarn over and draw thru all 3 loops.

Egg is worked from the top down.
Row 1 will be the top of the egg and Row 19 will be the bottom edge of the egg.


Easter Egg Coaster:
Row 1)  With MC, ch 7, sc in 2nd ch from hook and sc in each ch across, ch 1, turn. (6 sc)
Row 2)  2 sc in first st, sc in next 4 sts, 2 sc in last st, ch 1, turn. (8 sc)
Row 3)  2 sc in first st, sc in next 6 sts, 2 sc in last st, ch 1, turn. (10 sc)
Row 4)  sc in each st across, ch 1, turn. (10 sc)
Row 5)  2 sc in first st, sc in next 8 sts, 2 sc in last st, ch 1, turn. (12 sc)
Row 6)  sc in each st across, changing to white on last st, ch 1, turn. (12 sc)

How to change colors to white at the end of Row 6:

When you're making the last sc on row 6, insert hook and draw up loop as seen in photo below.  You will have 2 loops on the hook.

Next, drop the strand of the MC and let it hang (do not cut, you will be using it again later), Then bring in the white yarn, holding it behind your work.  Use your hook to grab the white yarn.


Pull the white yarn through the two loops remaining on the hook. You now have the white yarn on the hook and ready to stitch the next row.  Ch 1, turn and go on to Row 7.


Row 7)  2 sc in first st, sc in next 10 sts, 2 sc in last st, ch 1, turn. (14 sc)
Row 8)  sc in each st across, changing back to MC on last st, ch 1, turn. (14 sc)

How to change color back to MC at the end of Row 8:

As before, when you are working the last sc of row 8, insert hook and draw up a loop.  You now have 2 loops on the hook.


Next, drop the strand of white yarn and let it hang (again, do not cut, you will be using it again later), Then pick up the strand of MC that was left hanging at the end of row 6.  Use your hook to grab the strand of MC.


 Pull the MC  strand through the two loops remaining on the hook. You now have the MC back on the hook and are ready to stitch the next row.  Ch 1, turn and continue to Row 9.


Rows 9 - 11) sc in each st across, ch 1, turn. (14 sc)
Row 12)  sc in each st across, changing back to white on the last stitch, ch 1, turn. (14 sc) (you will follow same steps from above, dropping the strand of MC, and picking up the strand of white that was left hanging at the end of Row 8).
Row 13)  sc in each st across, ch 1, turn. (14 sc)
Row 14)  sc first 2 sts tog, sc in each remaining st across, changing back to MC on the last st, ch 1, turn. (13 sc)
(you will follow the same steps from above, dropping the strand of white, and picking up the strand of  MC that was left hanging at the end of row 12.  You can now cut the white yarn, you will not be using it any longer.)
Row 15)  sc first 2 sts tog, sc in each remaining st across, ch 1, turn. (12 sc)
Row 16)  sc first 2 sts tog, sc in next 8 sts, sc last 2 sts tog, ch 1, turn. (10 sc)
Row 17)  sc in each st across, ch 1, turn. (10 sc)
Row 18)  sc first 2 sts tog, sc in next 6 sts, sc last 2 sts tog, ch 1, turn. (8 sc)
Row 19)  sc first 2 sts tog, dc in next st, 2 dc in next st, 2 dc in next st, dc in next st, sc last 2 sts tog.
(2 sc, 6 dc) (this row creates the bottom edge of the egg.)
Do not ch 1, and do not turn, continue to border instructions.

Border:
The picture below shows what the egg looks like at the end of row 19.   Next, a border will be worked around the remaining 3 sides of the egg. Notice the strands on the right side where the yarn was carried up.  These will be covered up by stitching over them when stitching the border.

Start by working down the left edge, and sc in the end of each row.   Next, working in the ch sts from row 1,
sc first 2 sts tog, 2 hdc in next st, 2 hdc in next st, sc last 2 sts tog (this creates the top point of the egg).  Then,working up the right edge, sc in the end of each row, stitching over the strands that were carried up when changing colors.  End by joining with a sl st to the beg sc on row 19.  End off, weave in all ends.


Decorative Stitching (optional):
With a strand of white yarn on the yarn needle, make small stitches across the row that is one row below the top stripe and across the row that is one row above the bottom stripe, as seen in the photos below. Weave in ends.

Sunday, March 4, 2012

Chocolate Easter Bunny - New Pattern in Shop


I decided that the marshmallow bunnies needed a friend, a chocolate kind of friend. :) So I came up with this chocolate easter bunny.  Although I had to admit, it made me crave chocolate the whole entire time I was working on him.  :)

Bunny takes about 150 yards of Vanna's Choice yarn, but any worsted weight will work, and a size H crochet hook.  You also need a 3/8" button for the eye, some ribbon and fiberfill.  It's worked flat, making 2 bunny shaped pieces, which are then stitched together and stuffed.

Finished size is about 7" wide (across the bottom), x 15" tall.

Pattern is available in my Etsy shop

Tuesday, February 14, 2012

Olivia Update

I mentioned a while back that we adopted a new kitty, who was a stray in our neighborhood.  We named her Olivia and it was a bit rough going at first with our other two cats Gus and Grace.  They weren't very thrilled to have a newcomer in their midst, especially a kitten kind of newcomer who would not leave them alone.  But things have gotten calmer now, and they are all getting along. Mostly.  :) 

Olivia went in for her spay surgery last week and when I picked her up, I was given the instructions that she should take it easy for a few days.  Ok.  But exactly HOW you make a kitten take it easy wasn't specified.  I think because it is virtually impossible.  We did our best, but from the second she got out of the carrier when I got her home she went full speed ahead.  She has a little cushioned cube-y thing to sleep and recuperate in, but she just treated it like it was a huge catnip toy and as you can see from the pictures below, she jumped on it, sat on it, squished it, chewed on it and attacked it.  She did everything BUT sleep in it.  Goofy Cat!  :)


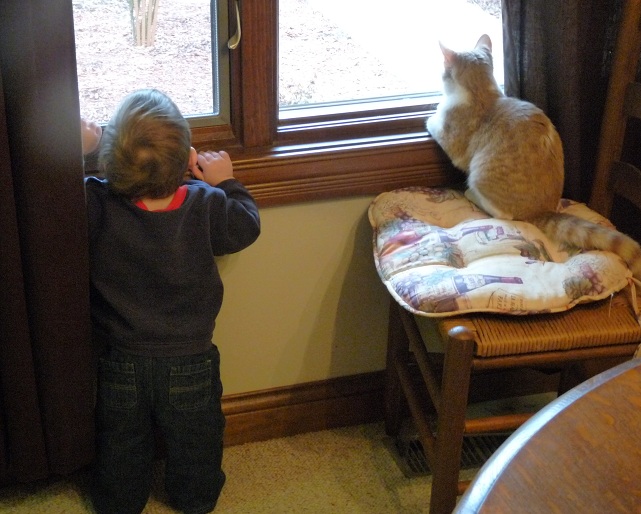
My nephew, Baby Eli just loves her and tries to follow her all over the house.  I caught a picture of them last week looking out the window together.  :)  I imagine they will be good friends as they grow up together.  :)